Monday, May 24, 2010

When Life Gives You Lemons...

One of my favorite things about island life is the abundant supply of lemons and, with our own little tree in the garden, the availability of freshly squeezed juice just mere steps away.  As a long time lover of lemons (and generally all things tart), I've been using them wherever I possibly can.  Lemonade, cake, chicken, rice, bars, tea, fish... The list goes on, yet still I continue to search out new ways to cash in on our yellow bounty.

our little lemon tree

The other day a friend asked me if I had any good dessert recipes.  With my standard disclaimer that I am more cook than bake, I asked him what type of desserts he liked.  When he responded with liquid-ish items, including yogurt and vla, my interest peaked; these are the types of desserts that are right up my alley.  For those who don't know what vla is (don't worry, neither did I), it is a Dutch custard product that, to the best of my wiki knowledge, is similar to flan. This same friend, just moments before posing the dessert question, had recited a recipe for eggs that incorporated lemon juice.  I took a quick mental stock.  I knew he liked lemon.  I knew he ate eggs.  I knew he enjoyed the consistency of custards.  I knew exactly what to make.

bowl of lemons

Lemon curd (or spread) is one of those items I always find myself stopping to look at in the grocery store. I consider it and then put right back on the shelf.  Aside from the exaggerated price, I am generally disappointed with products containing prefabricated pie filling (blame my mom for spoiling me with homemade lemon meringue) and I am quick to assume that the fancy jelly aisle jars contain precisely that.  It looks good in theory, but I know better than to be tempted by pretty packaged promises.

juicer w/cut lemon

Fresh lemon curd is seriously as simple as zesting a couple of lemons, squeezing out the juice and mixing it with sugar, eggs, and butter.  I'm not going to go through the motions of telling you exactly how to make it, instead I will just cut to the chase and suggest that you use the recipe posted at joyofbaking.com; the results were simply to die for and I couldn't explain it any better myself.  Do yourself one better and bake her cream scones too.  You'll thank me (and Joy of Baking) for it later.

lemon curd

At first taste, I immediately announced that the spread was way too sweet.  Then I instantly changed my mind and deemed it far too tart.  My confused mouth sent mixed messages to my brain, and I took a good couple of minutes to battle it out in my mind; Sweet?  Tart!  Sweet!  Tart?   I argued with myself as I continued taking tastes.  Whatever it was, it was good, so we loaded our basket with scones and went out to the terrace to enjoy the luscious lemon curd in all of its full flavoured glory. 

lemon curd w/cream scones

Sweet...  Tart...  Sweet... Tart...  I honestly couldn't decide.  That's how I knew it was perfect.
.

Saturday, May 15, 2010

This Is How I Roll

For almost seven months I have been tortilla free.  This is not a lifestyle choice, it is a situation of circumstance.  On the odd occasion that I do find a package for purchase, at more-than-meat prices for a small bag of eight, I've been forced to go without (aside from the ones my sister sent at Christmas!) for the duration of my island life.

Last October, when I first learned of my unfortunate lack of wrap, I searched for (and found) a recipe for flour tortillas.  Since then, I have been in a constant conflict with myself over whether or not I should try. "There must be some secret formula for tackling tortillas or everyone would always be making them," I thought to myself while reviewing the way too simple steps and, even though my printed copy omitted any mention of a proper press mechanism, I was stubbornly insistent that one was needed in order to make them right.  Each time I considered giving it a shot, I quickly talked myself out of it, balking at the imminent disappointment for lack of the "real thing".

Now, all these months later, with my travel plans recently confirmed for a return trip to the lovely land of groceries, one would assume that I could hold out for just a few more weeks (wrong!)  In recollection, perhaps it was even because of that; the knowing that an actual burrito was in my foreseeable future was the straw that finally broke this camel's back.   Whatever the case, I was bravely inspired.  Besides, other than a couple hundred grams of flour, I really had nothing to lose.

The following photos were taken from my second batch of tortillas, not because the first ones were a flop, but because they were so terrific that I just had to make them again (along with a spelt-wheat batch for a friend). I will likely never buy tortillas from the grocery store again. Yes, really.

Flour Tortillas

rolling pin

To make six medium sized tortillas, combine 225g (1½ cups) flour, ½ tsp baking powder, a little less than ½ tsp salt and a pinch of sugar in a bowl. Cut in 1½ Tbsp of lard until well blended. Gradually add 125 mL (½ cup) lukewarm water, mixing to form a crumbly dough. I find that my hands are, by far, the best equipment for this.

crumbly dough

Once you have a nice crumbly dough, form it together into one large ball and knead very well until smooth. Form the dough to a cylindrical shape and cut into six equal pieces; roll each piece into a ball and set them aside for about fifteen minutes. This is the perfect time to prepare whatever you will be filling your tortillas with once you finish cooking them.

six equal pieces | resting dough balls

After their rest, place a seriously generous amount of flour on your counter. Working one at a time, flatten each of the dough rounds with your hand, flip it over, then roll it out flat with a rolling pin. Use a good amount of pressure and roll the dough as thin as possible, continuing to flip as necessary and keeping your work area well floured so your tortillas don't stick to the counter or the rolling pin.

dough ball flattened by hand

rolled out thin

Cook each tortilla on an ungreased griddle or cast iron pan over medium heat, flipping when the first side begins to blister and brown. As your tortillas puff up, keep them pressed flat with the back side of a spatula, spoon or flipper. When they become too bubbly to keep flat, they are done. Total cooking time will be roughly 1½-2 minutes each. As you remove your tortillas from the pan, wrap them in a dry towel to keep them warm.

before flipping the blistering tortilla

pressing down bubbles

I could not, in good conscience, pass along this recipe without first ensuring that these tortillas had endured a full range of qualification tests to prove their worth. Having now used this recipe to make tortillas for soft wrapped burritos, fried quesadillas and baked enchilada-ish style wraps, I can confidently encourage you to try these easy, delicious and low cost replacements for any flour tortilla variety that you'd normally buy at the store.  Olé!

warm tortillas

white flour and spelt wheat tortillas

Recipe for Tortillas De Harina (Flour Tortillas) as originally posted at Recipezaar.
.

Sunday, May 9, 2010

Braised Blackberry Pork

On our last trip to the "big" market, we bought a large jar of blackberries and, while I typically find the preserving liquid too sweet or the fruit too mushy in factory processed canned fruit, I was extremely impressed with both the quality and the flavour. These whole, firm berries, preserved in their own juice without added sweeteners were a surprise find indeed.

After eating most of the berries with yogurt, the jar still remained half full of juice. Sloshing it down the sink seemed such a waste so I challenged myself to find something to do with it. After spending some time searching recipes online, I became inspired by a mishmash of possibilities and created a pretty incredible dish. So incredible, in fact, that I made it two days in a row.

Braised Pork Rolls with Blackberry Gravy

To begin, brew a half cup of strong black tea.  Unlike the wine in last month's Drunken Applesauce, this tea is all for the recipe so, if you would like a cup to drink, be sure to brew more.  Once your tea is steeped, remove the tea bag or tea leaves and add one half of a vegetable or chicken bouillon cube.  Add one cup of blackberry juice and two tablespoons of balsamic vinegar.  Stir and set this aside.

Next, finely dice one small onion (reserving half of it for later), a bit of celery and some fresh parsley; sauté in a small amount of butter until the onions are soft.  Remove from heat and stir in some salt, pepper and poultry seasoning (I use Vegeta but I know this is not possible for everyone so the former will suffice).  Toss in a good handful of torn up day old bread and stir to mix well.  If the mixture seems a bit dry you can add a touch of water (or some of the juice as prepared above) but avoid making it too wet as it will end up very soggy after cooking.  Making this two days in a row, mine was too moist on day one; I opted for more butter and no liquid on day two and it was perfect.

torn bread, diced onions, celery, parsley

Now take your boneless pork chops and pound them to make them fairly flat and thin.  I just used two random pork chops and deboned them before hammering; they didn't look so pretty and were irregular in shape, but it didn't matter in the end.  Divide your bread mixture to cover both flattened chops, then roll them up, tucking in the edges to make sure the stuffing stays inside.  If your chops are very fatty around the edges they will curl some while they cook which might make them come a bit undone; you can tie them up with strings, but I don't like to mess with them afterward so I just don't bother.  Once your little rolls are tightly packed and well formed, dredge them in flour and set aside.

flattened pork chops with stuffing

dredging stuffed pork rolls

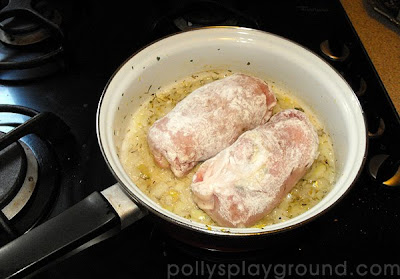
In the same saucepan that you used to make the stuffing mix, sauté the reserved half of the onion plus a teaspoon of thyme (I used dried - if you have fresh, adjust accordingly) in a small amount of fat (I used pork lard) - just enough to keep the onions and thyme from burning.  Add your pork rolls and lightly brown on all sides; leave them seam side down and then add 1/3 of the the tea/juice mixture you have prepared.  Stir around the pork to mix the juice with the onions, bring to a gentle boil, cover, reduce the heat to low and simmer for an hour.

browning pork rolls with onions and thyme

stuffed pork ready to simmer

Once you put the lid on the pan, you have time to clean up your mess, peel potatoes and put them on to boil, fix your salad or prepare your vegetables.  Every 15 minutes(ish) stir the sauce, lifting the pork to scrape any stuck bits off the bottom of the pan.  Add a tiny bit more of your reserved juice to the pan, drizzling over the pork and bringing the sauce back up to a boil each time before replacing the lid.

After an hour, remove the pork from the pan, place on a plate and cover with the lid to keep warm.  Mix a tablespoon or two of flour (I just used the rest from the dredging) with an equal amount of the reserved juice and mix well.  Slowly add your floury juice to the sauce in the pan, whisking constantly, to make the gravy.  Add the remaining tea/juice and continue to stir, allowing it to boil for about five minutes to reduce and thicken (and cook away any raw pork 'ick' if you used the dredging flour like I did).  Remove from heat, stir in a few whole berries, return the pork to the pan and serve  (alternatively you could arrange on plates or place in a proper serving dish - we aren't always so civilized).

braised pork rolls w/blackberry gravy | horseradish mashed potatoes

This very simple stove top meal will be on your table in just over an hour and the simmering time, which allows for full kitchen cleanup plus meal accompaniment preparation, is actually a time saving bonus.  An easy way to make your everyday pork chop extraordinary, giving you plenty of time to relax and enjoy these individual tender braised pork rolls packed with fresh stuffing smothered in rich burgundy blackberry gravy.

stuffed rolled pork w/ blackberry gravy | horseradish mashed potatoes

Wednesday, May 5, 2010

You Say Potato

The other day, while chatting with my friend Jeff, he happened to mention the big basket of chips he was currently eating for dinner. "Fries?" I asked, seeking some confirmation which could allow me to conjure up the proper visual as, in addition to countless global chat discussions, my recent travels have taught me that the (sometimes) translation of fries into chips and chips into crisps can make a mind bending task of correctly determining the subjective potato. "Fries," he said, confirming my assumption and immediately triggering a Pavlovian like response. He continued to type with his fry fiending fingers, teasing my tummy as he described his homemade andalouse dipping sauce. "Andalouse?" I asked. "Andalouse," he said, quickly spelling out the mix of ingredients, "it's Belgian."  I've heard great things about Belgians and their fries; now I was drooling AND curious.

The bonus part of the whole conversation is that Jeff lives in Australia. This means his dinner plate was on the table long before I had even considered what I would be making for mine. Inspired, I wiped my chin, typed a quick brb and disappeared into the kitchen to prepare my potatoes.

Expletively Delicious Oven Fries

There are a million ways that you can make fries, and everyone has their method. This is mine. First, find your potatoes and scrub them well. If you prefer them without skins you can peel them; I suggest leaving them on. Slice them to your desired thickness, place in a bowl and cover them with cold water; let them soak for at least 30 minutes. Soaking will remove starch and sugars, helping to make your oven fries beautifully crisped.

potatoes scrubbed and sliced

potatoes soaking in cold water

After their cold water bath, drain the potatoes using a strainer, running a bit of fresh cold water over them to remove any excess starch and floaty bits. Let them rest in the strainer while you dry their bathtub bowl with a towel to remove any lingering liquid. Do not put the potatoes back in the bowl (yet).

Pour a little bit of extra virgin olive oil in the bowl. The amount of oil you use will depend on how many potatoes you have sliced. Less oil is more effective; you want enough to very lightly coat the potato slices, not drown them. Now add any spices and herbs that you'd like to the oil. I use a tiny amount of garlic powder, pepper, paprika and Vegeta now and salt them later.

extra virgin olive oil | garlic powder | pepper | paprika | vegeta

Place a clean, dry towel, folded to double thickness, on your counter. Place your potato wedges on one half of the towel and fold the other side over to cover them, pressing down on the towel to pat the potatoes dry. If you are making a large batch, repeat this step a few times rather than trying to dry all of your potatoes at once. The key is to remove as much extra moisture as possible.

drying the potatoes

As you dry your potato slices, place them back in the bowl and toss them gently with the spiced oil to coat. I find that adding the slices a few at a time, rather than dumping them all in to the bowl at once, is much more effective. Add and stir. Add and stir. Repeat until your potato slices are well coated. Arrange your potatoes in a single layer, skin side down, on a very lightly oiled shallow baking tray.

potatoes tossed with oil and spices

single layer of potato slices on baking tray

Here is the part where we all need to make some decisions. As my faithful readers already know, my oven is either 'on' or 'off' and preheating results in a very high cooking temperature. While high temperature is necessary for achieving the crispy outsides; unfortunately, for me, the fries would be charred beyond edible on the outside with soggy, half baked middles. This being said, the following method works well for me; though you may opt to cook in a preheated oven.

I place the potatoes in the gas oven and then turn it 'on'. This allows the insides to bake slowly to a beautiful fluffiness. After about 20 minutes, I flip the slices to skin sides up, return them to the oven for the final crisping stage and, keeping an eye on the oven, remove them when they "look good" - for me that's golden (about 15 minutes later). Immediately sprinkle with sea salt and serve.

Preheated or not, as soon as you put your potatoes in the oven, it is time to make the sauce. The not-so-bonus part of Jeff living in Australia is that, by the time I reached this stage, he was already in bed and I had long since closed our chat window. Left to fend for myself, I incorrectly Google searched andelousse and landed an ingredient list that sounded close enough to his version (plus I had most of the list on hand). You can correctly search for andalouse... or you can just do what I did: mix a couple good spoonfuls of mayonnaise together with some finely minced onion, a good dose of tomato paste, a squeeze of fresh lemon juice, some salt, white pepper and paprika and leave it to stand while the flavours develop. It probably wasn't andalouse, but it was definitely divine for dipping.

dipping sauce

You can call them fries or you can call them chips. You can call them crisps, wedges, pommes or whatever else you'd like. Myself? I dip, dip, dip and call them expletively delicious.

expletively delicious oven fries

What's your best method for cooking oven fries? What's your dip? Please leave a comment below or join the discussion @ The Perfect Avocado on facebook.
.

Sunday, May 2, 2010

Believe the Hype

I know. For those of you who listened in on my conversation (not) about coconut, the suspense is killing you.  "Did she ever make that loaf?" you wonder anxiously, refreshing the page at a constant interval in anticipation of the real coconut post.  Ego aside, it's likely you're not; however, I do know that my sister is.  I think I've kept her hanging long enough.

As you may or may not know, this was my new loaf pan test drive.  I assembled all of the ingredients I needed to make bills Coconut Bread, which my sister had recommended from Baking Bites, and took out my shiny new orange pan.  Coconut + New Kitchen Gear = Excitement².

infamous loaf pan w/coconut bread ingredients

Let's forget about the adding and stirring, fast forward through the baking time, and cut to the chase.  After removing the beautifully baked bread from the oven and spending a solid six minutes carrying it through the house proclaiming it's excellency and inhaling the fresh baked aroma,  I turned it out onto the counter (across the backs of 3 small plates - I don't have a baking rack) and tried to forget about it while it cooled.

bills coconut bread

bills coconut bread

This bread (and my loaf pan) is definitely a keeper.  A nice golden crust surrounds a moist (but not soggy) loaf of luscious coconut heaven.  It is marvelous on its own, but would be incredible as a base for some spreads (perhaps curried shrimp?), divine with mulligatawny soup, and insane as the outsides of a grilled cream cheese and pineapple sandwich.  I kept generating ideas as I ate the loaf, slice by slice, which stayed fresh until finished three days later; I will be sure to try some of them next time.

basket of bills coconut bread

bills coconut bread

bills coconut bread, sliced

Because we don't have a toaster, but I was unwaveringly adamant to try, I placed a couple thick slices in the oven to enjoy with our tea on the terrace.  It took longer to toast than desired, so this was our only taste, but I can now properly attest to the fact that this coconut bread, served hot and crispy along with the recommended mandatory pat of butter, really is, in the words of my sister, "to die for."  Do believe the hype.

toasted coconut bread w/melting butter

Thanks to Bill Granger for developing, to Baking Bites for posting, and to my sister for recommending this recipe.  Pass it on...
.