Wednesday, May 5, 2010

You Say Potato

The other day, while chatting with my friend Jeff, he happened to mention the big basket of chips he was currently eating for dinner. "Fries?" I asked, seeking some confirmation which could allow me to conjure up the proper visual as, in addition to countless global chat discussions, my recent travels have taught me that the (sometimes) translation of fries into chips and chips into crisps can make a mind bending task of correctly determining the subjective potato. "Fries," he said, confirming my assumption and immediately triggering a Pavlovian like response. He continued to type with his fry fiending fingers, teasing my tummy as he described his homemade andalouse dipping sauce. "Andalouse?" I asked. "Andalouse," he said, quickly spelling out the mix of ingredients, "it's Belgian."  I've heard great things about Belgians and their fries; now I was drooling AND curious.

The bonus part of the whole conversation is that Jeff lives in Australia. This means his dinner plate was on the table long before I had even considered what I would be making for mine. Inspired, I wiped my chin, typed a quick brb and disappeared into the kitchen to prepare my potatoes.

Expletively Delicious Oven Fries

There are a million ways that you can make fries, and everyone has their method. This is mine. First, find your potatoes and scrub them well. If you prefer them without skins you can peel them; I suggest leaving them on. Slice them to your desired thickness, place in a bowl and cover them with cold water; let them soak for at least 30 minutes. Soaking will remove starch and sugars, helping to make your oven fries beautifully crisped.

potatoes scrubbed and sliced

potatoes soaking in cold water

After their cold water bath, drain the potatoes using a strainer, running a bit of fresh cold water over them to remove any excess starch and floaty bits. Let them rest in the strainer while you dry their bathtub bowl with a towel to remove any lingering liquid. Do not put the potatoes back in the bowl (yet).

Pour a little bit of extra virgin olive oil in the bowl. The amount of oil you use will depend on how many potatoes you have sliced. Less oil is more effective; you want enough to very lightly coat the potato slices, not drown them. Now add any spices and herbs that you'd like to the oil. I use a tiny amount of garlic powder, pepper, paprika and Vegeta now and salt them later.

extra virgin olive oil | garlic powder | pepper | paprika | vegeta

Place a clean, dry towel, folded to double thickness, on your counter. Place your potato wedges on one half of the towel and fold the other side over to cover them, pressing down on the towel to pat the potatoes dry. If you are making a large batch, repeat this step a few times rather than trying to dry all of your potatoes at once. The key is to remove as much extra moisture as possible.

drying the potatoes

As you dry your potato slices, place them back in the bowl and toss them gently with the spiced oil to coat. I find that adding the slices a few at a time, rather than dumping them all in to the bowl at once, is much more effective. Add and stir. Add and stir. Repeat until your potato slices are well coated. Arrange your potatoes in a single layer, skin side down, on a very lightly oiled shallow baking tray.

potatoes tossed with oil and spices

single layer of potato slices on baking tray

Here is the part where we all need to make some decisions. As my faithful readers already know, my oven is either 'on' or 'off' and preheating results in a very high cooking temperature. While high temperature is necessary for achieving the crispy outsides; unfortunately, for me, the fries would be charred beyond edible on the outside with soggy, half baked middles. This being said, the following method works well for me; though you may opt to cook in a preheated oven.

I place the potatoes in the gas oven and then turn it 'on'. This allows the insides to bake slowly to a beautiful fluffiness. After about 20 minutes, I flip the slices to skin sides up, return them to the oven for the final crisping stage and, keeping an eye on the oven, remove them when they "look good" - for me that's golden (about 15 minutes later). Immediately sprinkle with sea salt and serve.

Preheated or not, as soon as you put your potatoes in the oven, it is time to make the sauce. The not-so-bonus part of Jeff living in Australia is that, by the time I reached this stage, he was already in bed and I had long since closed our chat window. Left to fend for myself, I incorrectly Google searched andelousse and landed an ingredient list that sounded close enough to his version (plus I had most of the list on hand). You can correctly search for andalouse... or you can just do what I did: mix a couple good spoonfuls of mayonnaise together with some finely minced onion, a good dose of tomato paste, a squeeze of fresh lemon juice, some salt, white pepper and paprika and leave it to stand while the flavours develop. It probably wasn't andalouse, but it was definitely divine for dipping.

dipping sauce

You can call them fries or you can call them chips. You can call them crisps, wedges, pommes or whatever else you'd like. Myself? I dip, dip, dip and call them expletively delicious.

expletively delicious oven fries

What's your best method for cooking oven fries? What's your dip? Please leave a comment below or join the discussion @ The Perfect Avocado on facebook.
.

Monday, April 12, 2010

Feed Back: Weird Tuna

A few weeks ago I wrote about solving my own grocery day dilemma which prompted Andrew to respond with a comment about his (self-proclaimed) weird tuna concoction involving apples and onions. I was intrigued.

half apple on cutting board

I have an odd relationship with onions.  I like them cold and raw (preferably minced very fine) or cooked, at the very least, to a completely softened state.  If they fall somewhere in between, I just can't seem to stomach them; the short cooking time for tuna melts results in warm, raw onions and this is the precise reason I avoid adding them to mine.  I decided to start with a frying pan.

sautéing onions and walnuts

As I began my onion sauté, I though about how much I love the cozy combination of apples and walnuts and wondered how they would work in this mix.  Since we were already working with weird, I crushed a few and added them to the pan.  When the onions were done to my preference point, I moved them to a mixing bowl, along with my already diced apple (skins intact for some additional colour) and a short stalk of celery that I wanted to use up.

apples, onions, walnuts, celery

This is the part where I must confess that I completely veered from the original plan and took this tuna in a whole new direction.  Already going nuts earlier, I kept building on instinct, now using the idea but making it my own.  The downside to this?  If the melts were a flop I could no longer hold Andrew responsible.  Still, I continued with confidence and worked on the dressing; a couple scoops of mayonnaise, some sea salt, fresh ground pepper, paprika, cayenne, lemon juice and a healthy dose of curry.

curried mayonnaise dressing

After stirring together the dressing, the apple mixture and one drained can of tuna, I scooped even amounts over thick beds of fresh cornbread, topping each with diced slices of cheese before popping the pan in to the oven to bake.

tuna mixture on cornbread

fresh out of the oven

The verdict?  Not weird, but wonderful.  Different flavours I would never have thought to try together, but am certainly glad I did.  Thanks to Andrew for sharing your idea; I hope you'll try my variation on your recipe.
 
curried apple tuna melts

Wednesday, March 17, 2010

The Devil Comes to Dinner

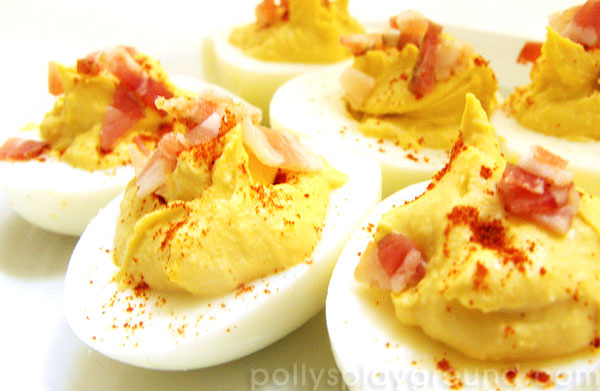
Deviled Eggs have always been one of my favorite party foods. I'm actually embarrassed to admit how many times I've made a batch, only to have them eaten before any guests arrive (if they are gone before they get here, nobody knows they're missing, right?). Today it occurred to me that waiting for a social occasion to stuff some eggs seemed silly, so with three hard boiled on hand, I decided I'd make them for lunch.

horseradish deviled egg

Eggs for entertaining are easy; arrange them on a platter, avoid eating them before there's a knock at your door and serve with napkins plus a side shaker of salt.   Trying to build a meal around these tasty morsels becomes somewhat of a dilemma. What compliments a stuffed egg, allowing it to evolve it from appetizer to main course? Quite hungry and with few ingredients on hand, I scoured my cupboards for inspiration. My eureka moment came in the form of soup. Dining on Deviled Eggs now made perfect sense.

Quick Tomato Soup with Horseradish Deviled Eggs

quick tomato soup

To make the soup, sauté one diced onion, three cloves garlic and a handful of thinly sliced pancetta in a bit of olive oil. If you don't have pancetta, you could try some cooked bacon or omit it completely, though it adds a subtle smokey flavour that would have been missing without it.

When everything is golden, add a can of peeled tomatoes (chopped), a touch of tomato paste and a small spoonful of brown sugar (it mellows the acidity); then top it off with about 500mL of water plus a vegetable stock cube. Once your pot begins to boil, Reduce the heat and simmer, lifting the lid to stir occasionally and to season with salt, pepper, herbs and spices that satisfy your taste. 

more quick tomato soup

Once your soup is simmering, it's time to do the devils. Slice 3 hard boiled eggs lengthwise, scooping the yolks into a separate bowl. Add a small spoonful of mayonnaise, a few pinches dry mustard, a sprinkle of salt, a dash of white pepper and a touch of horseradish cream; mix well. Carefully fill the hole in each egg white with a scoop of the yolk mixture. Sprinkle with paprika and top with thinly sliced pancetta.

horseradish deviled eggs

Now return to your soup. Remove from the burner and puree with a hand blender until smooth (be careful to not splatter it across your kitchen - using a tall, narrow pot helps). Divide the soup among bowls and garnish with a few drops of cream or a sprinkle of herbs. Serve with Horseradish Deviled Eggs and fresh bread.

quick tomato soup w/ horseradish deviled eggs

We each ended up with 3 (half) eggs and 2 bowls of soup (and wished there were leftovers for tomorrow).  If you are feeding more than two people (or wish for leftovers), you can easily increase the amounts of everything.  The meal took about 30 minutes to prepare. If you don't have hard boiled eggs, add another 15 minutes - I suggest making them first and letting them cool completely. Trying to devil hot eggs can be a little hellish.

Are Deviled Eggs part of your main meal?  What's your favorite recipe?  What do you serve them with?  I'd love to hear about it...
.

Sunday, March 7, 2010

Grocery Day Dilemma

Grocery Day has always been my most difficult of days to decide what to make for dinner. I'm not referring to the obvious pre-shop annoyance of "there's nothing to eat" while sneering at bare cupboards and an empty refrigerator; I'm referring to the just-unpacked-enough-food-to-feed-a-small-army shopping extravaganza.

Having just endured my most hated task of unpacking the bags, I seem to become overwhelmed by the abundance of it all. I stare at the selection of meat on the counter, trying to decide which will end up on my plate so I can get the rest in to the freezer. I run through an imaginary taste test of every fresh vegetable I've placed in the crisper or pantry, thinking to myself "mmmmm mashed yams" or "ooooh steamed broccoli". I gaze lovingly at the new assortment of cheeses. I walk from cupboard to fridge and back again (quite a few times) and stare blankly at the glistening sealed containers and bold coloured boxes, their labels forming twinkly eyed smiling faces which call out "pick me!" Too many choices; I want it all. My brain suffers inspiration overload (I notice I've inadvertently forgotten to pick up laundry detergent) and I decide it's too late to start cooking. I order pizza.

Here on my Island, ordering pizza isn't an option so my Grocery Day dilemma now has a new ending.

Tuna Melts

grocery day dilemma

For my tuna melts, you'll need 2 hard boiled eggs. Start them as soon as you finish dragging the grocery bags in to the kitchen; by the time you've put everything away they'll be finished boiling. Run them under cold water to let them cool. Since you're already boiling 2 eggs you should probably just make 4. It's always nice to have a couple extras in the fridge.

Drain a can of tuna; dump it in a bowl with some diced dill pickle (I use a large one) and the eggs (chopped). Divide a lemon and squeeze the juice of one half over the bowl. Add some of the water from the pickle jar (maybe a Tbsp-ish?) Season with a bit of salt, a lot of fresh ground pepper and some paprika.

salt, pepper, paprika and lemon

Next add a couple glops (yes, glops - I'm sure you know what I mean) of mayonnaise. You 'could' use miracle whip or some other salad dressing - in my opinion its not a substitute and they wouldn't taste the same. Sometimes instead of all mayo, I half/half it with soft cream cheese. Really it's up to you.

Next cut 6 thick slices from the fresh loaf of french bread. "What french bread" you ask? The french bread you picked up at the store bakery specifically for making tuna melts. It is, after all, Grocery Day. Lightly spread each with butter or margarine (I said lightly) and snuggle them, butter sides down, in to a high-edged baking pan. The butter and high edges will keep the bread from drying out when you "melt" them.

Divide the tuna mixture evenly among the slices of bread. I stress evenly because you may be tempted to add less tuna to the smaller pieces of bread. This sucks for the people who get served the small pieces and end up getting shorted on both bread AND tuna. Place a thin blanket of cheese over each. We usually get our cheese sliced from the deli which works perfectly. Try to not use a sharp cheese which will overpower the rest of the ingredients and remember that you are making tuna melts, not cheese toast; a little goes a long way. I like to add some colour by sprinkling the tops with a touch of paprika. French bread, tuna, mayo and Gouda cheese, while incredibly tasty, tends to look rather bland.

oven ready

Now pop them into your oven and let them become melts. I can't advise on temperature or length of time since my oven doesn't really work properly. I use high heat and take them out when the cheese is melted and starts to bubble, but before they burn; enough time to rinse the cutting board, bowl, knife and spoon I used for preparation and to put some plates on the table. Basically, if you aren't eating within 30 minutes of putting your groceries away, you got distracted.

toasty tuna melts

So this is my no-fail solution to the Grocery Day dilemma. I can confidently arrive home from the store without dread or panic and can ignore my taunting pantry until tomorrow. And then it's a whole new story.

Did you try these tuna melts? Do you have your own solution to the Grocery Day dilemma? I'd love to hear about it...
.